Showing posts with label Mac OS X. Show all posts

Monday, May 27, 2013

Avid MXF to FCP - Can FCP import Avid MXF Files on Mac?

Follow the guide below and you will know how to import Avid MXF to Final Cut Pro without rendering or any other problems on Mac OS X (Mavericks 10.9 included). 

Q1:
I'm trying to convert 2 .MXF files and they are exported from my Avid, but there is no file structure. I've tried downloading lots of codecs, 3rd party Quicktime programs but nothing seems to read them. Any help you could give me would be brilliant.

Q2: I have AVID MXF files that I would like to import into FCP. Any ideas other than spending $400. for the MXF Import program. I tried the Sony EX Transfer software but that wouldn't do it. I don't have access to an AVID to export quicktimes.

Q3: The mxf files generated by Avid were not able to be read by Final Cut Pro. I just spend an hour or so trying to import some Avid MXF files after installing the new Calibrated MXF demo, but I couldn't get anywhere. I notice that they say they can only open Avid v3.1 mxf files. I guess that's my problem, some of my mxf files are older. Any plans to add broader Avid support?


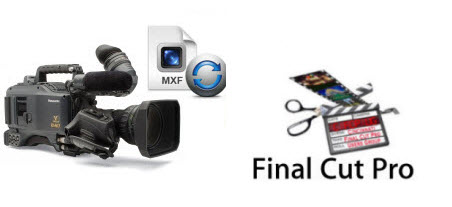
As you see, many folks are talking about how to import Avid MXF files into Final Cut Pro for editing natively. The thing is, even the lastest FCP X does not work with the Avid MXF codec. MXF is used natively by Avid applications to store video and audio "essence" with associated metadata. It has also become the preferred file format for interchange of media files between Avid solutions and products developed by other vendors. Well, the original MXF files is from Avid, to ingest Avid Media Composer generated MXF media-container to Final Cut Pro 6/7/X for editing smoothly, the easy workaround is to transcode Avid MXF footage to ProRes MOV format, which is natively supported by FCP. Along with some help from a professional Mac MXF to MOV Converter. It can be done.

To help those who wanna edit Avid MXF files in Final Cut ProX/7/6, here I share with you a simple guide to transcode Avid MXF to Apple Prores for getting into Final Cut Pro 7/X on Mac for further high quality and high performance editing.

Downloading the App - Pavtube MXF to ProRes MOV Converter
 
Overall, the program is a professional yet easy-to-use MXF to ProRes Converter on Mac OS X which can not only convert MXF files from Avid to Apple ProRes codec videos for Mac FCP 6/7/X editing, but also provide simple video editing functions for you. It will make you FCP editing workflow with Avid MXF files smoothly and everything becomes easy. Just download it and follow the tutorial below to achieve your goal smoothly.

Guide- Convert Avid MXF to MOV ProRes for FCP 6/7/X editing smoothly on Mac

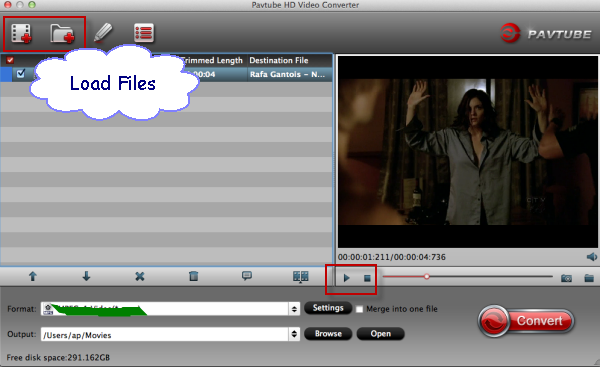
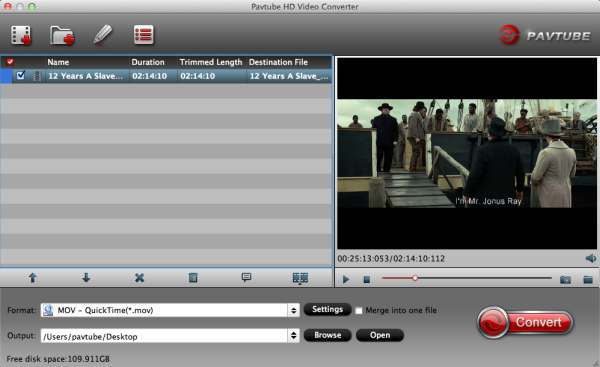
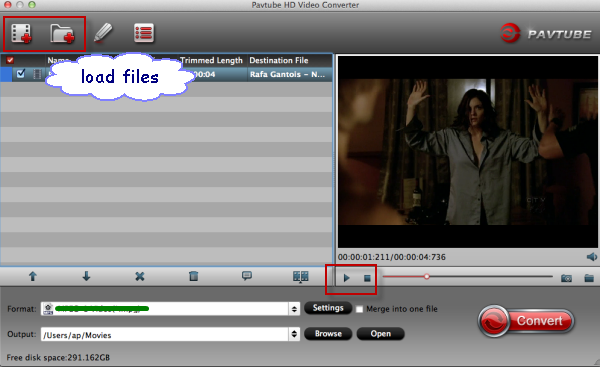
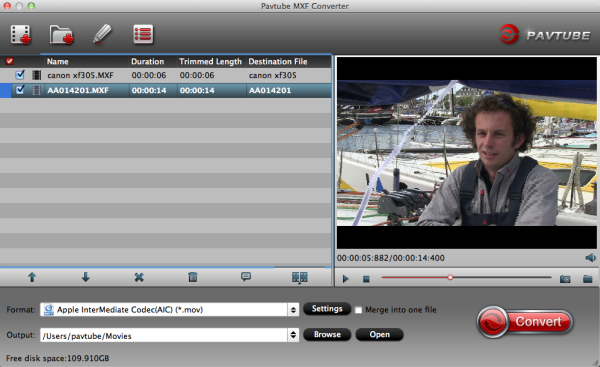
Step 1.
Free download and run the best Mac Avid MXF to FCP Converter for Final Cut Pro 6/7 and FCP X, add MXF videos to the program.


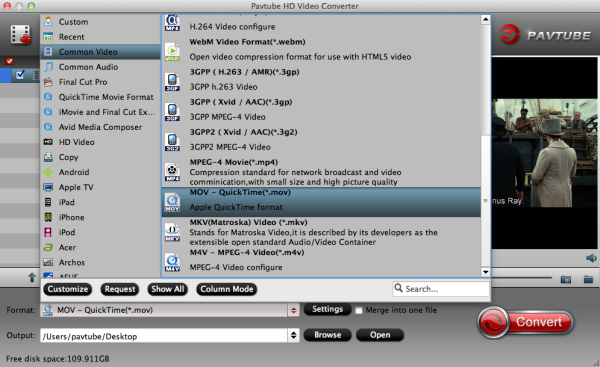
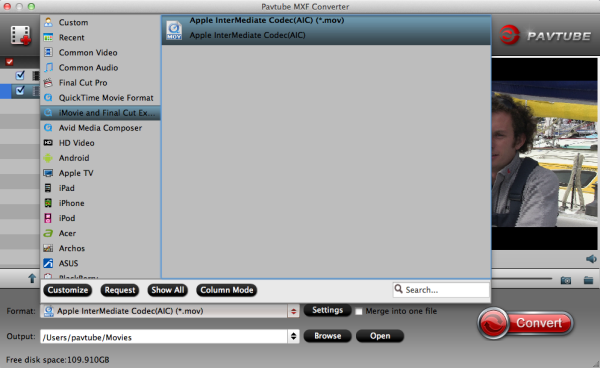
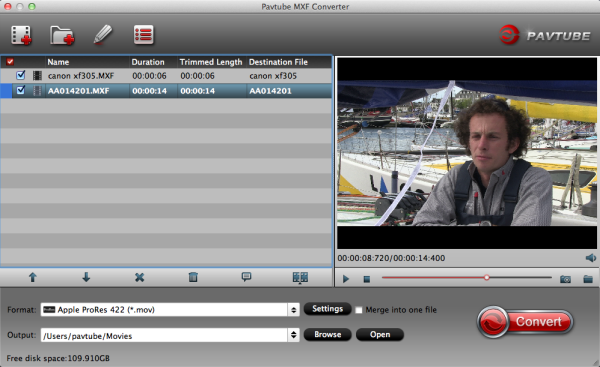
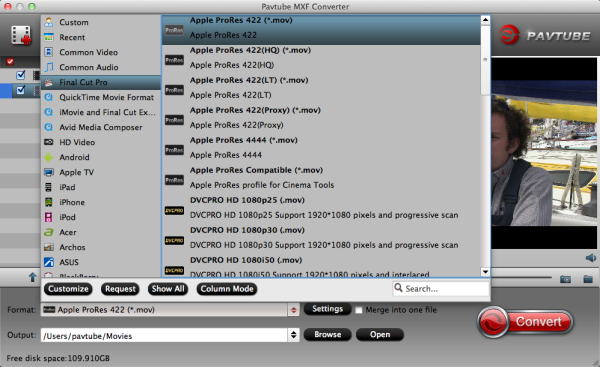
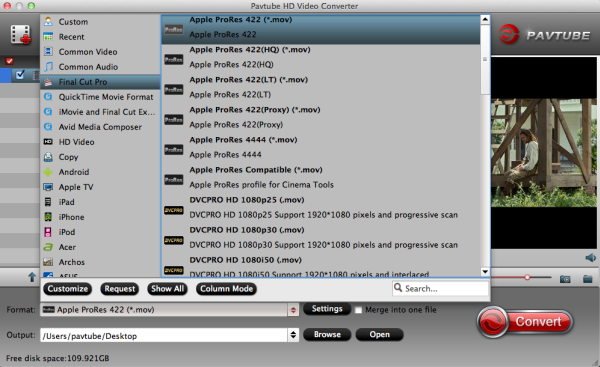
Step 2. Select output profile. If you want to edit Avid MXF file in Final Cut Pro 6/7 or FCP X, suggest you choose Final Cut Pro > Apple ProRes 422(*mov).


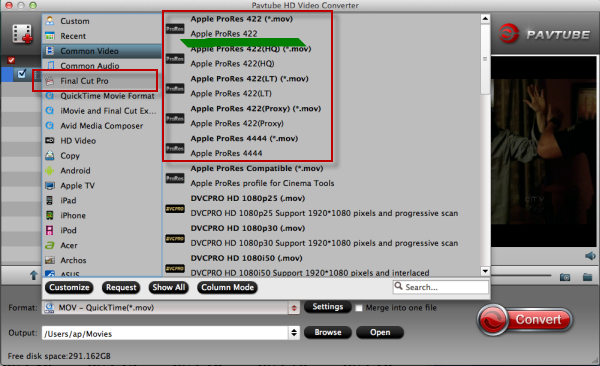
Tips: For editing in iMovie/FCE, you can choose iMovie and Final Cut Express > Apple InterMediate Codec(AIC)(*mov).

Step 3. Click Convert" button to start transcoding Avid MXF to ProRes MOV for Final Cut Pro.

Some more helpful features of the batch MXF to MOV Converter for Mac:

1. Settings- click to set video resolution(1920×1080/1440×1080/1280×720/720×480), bitrate (from 1Mbps to 20Mbps), frame rate (24p/30p)

2. Editor (next to "Add" icon)- click to set deinterlace, denoise, mute, volume up, trim, crop, etc.

Once the Avid MXF to MOV Conversion is done, you can go to the output folder to find the converted video files. Now you are free to import/edit Avid MXF files in Final Cut Pro under Mac without problems.

Read Related Articles:

XAVC to MOV Converter- Play Sony XAVC video with QuickTime on Mac

Follow the guide you can Convert Sony XAVC files to QuickTime MOV on Mac easily via XAVC Video Converter.

Model: F55, F5

The camera PMW-F55, F5 which used XAVC format was recently unveiled by Sony. XAVC is a new recording format which can support 4K resolution (4096 * 2160 and 3840 * 2160) at up to 60 fps, introduced by the famous Japanese camera manufacturer Sony on October 30, 2012. However, .xavc is still not as popular as other kinds of video formats such as AVCHD and MXF, so when you deal with the XAVC/XAVC-S footages, for example, importing Sony XAVC/XAVC-S to Mac applications like QuickTime for playing, you may encounter some format compatibility or video/audio synchronization problems.


This article is written to help XAVC users to solve such kind of problems by using XAVC Converter for Mac. It can help users fix all kinds of XAVC problems without losing the video quality. It offers an easy way to convert XAVC to MOV for playback on Mac. With it, you will be able to import XAVC videos to your QuickTime for playback with ease. Besides, by converting XAVC to MOV, you can transfer the generated files to your iPhone, iPad, Apple TV 3, etc to play with ease. If you are a Windows user, you can turn to XAVC Video Converter, which share similar functions with the Mac Version.

How to LosslesslyConvert Sony XAVC to QuickTime .MOV on Mac

Step 1: Load XAVC footages to the XAVC Video Converter

Run Pavtube Mac Sony XAVC to MOV Converter. Click "Add file" or "Add from folder" button, browse to the XAVC footages and load them to the converter.


Step 2. Choose QuickTime MOV as the output format

To transfer Sony XAVC/XAVC-S to QuickTime on Mac, the best way is to convert XAVC to MOV.

Click on the drop-down list of "Format", and follow  "Common Video"> "MOV-QuickTime (*.mov)" or "Common Video" > "H.264 Video (*.mp4)".

To retain the HD video quality, you can select "HD Video"> "H.264 HD Video (*.mp4)".


Tips: Click the "Settings" button and set proper video/ audio parameters. You can reset set the video size, bitrate and fame rate. If you would like to use default settings, simply skip this step.

Step 3: Start converting XAVC to MOV

After the options above, press the "Convert" button to launch the conversion from XAVC/XAVC-S to MOV on Mac.

After converting XAVC to MOV, you can view XAVC on the Mac QuickTime and do whatever you want with the XAVC footages on Mac.

See also:

Sunday, May 19, 2013

Import and Edit Canon C500 MXF in Adobe Premiere Pro CS 4/5/6 on Mac

In this article, I will shows the best method for editing Canon C500 MXF in Adobe Premiere Pro CS 4/5/6 on Mac. If you have problems when importing Canon C500 MXF to Adobe Premiere Pro on Mac Mopuntain Lion, please follow this post below to know how to import Canon C500 mxf footage to Adobe Premiere Pro CS 4/5/6 for editing without rendering.  


Canon has officially announced the EOS C500, the professional 4K video camera output that it promised at the NAB trade show in April. A continuation of the concept of the C500, it can capture Raw 4K video footage and offers frame rates of up to 120fps in compressed 4K. It also captures 2K footage (2,048 x 1,080 pixels) at 12-bit, with 4:4:4 Y'CbCr chroma sub-sampling for high colour resolution. For 4K and 2K recording, uncompressed output is delivered to external recording systems via built-in dual 3G SDI ports. Dual HD-SDI monitor outputs support external live monitoring. Simultaneously, HD content can be written to dual onboard CF cards to provide proxy video for offline NLE systems.

Read More: Canon XF300 | Canon XF105 | Canon XF100

Canon C500 is very excellent, you may have bought a C500 camcorder and need to edit C500 files in Premiere Pro CS 4/5/6, but C500 MXF files are not well supported by Premiere Pro CS, as you may encounter many audio and video problems, such as bitrate unsupported, and synchronization program. 

We did a test, we had only been able to get 35Mbps and 25Mbps files to work in PPro CS4, we have to use CS5 or above to edit natively 50MBPS 422HD recordings with AMA MXF or Canon XF Plugin. To edit C500 MXF videos, you’d better upgrade to CS5/CS6. But some users can’t upgrade to CS5/CS6, what will you do? 


In fact, it is an easy solution for many users, it can save money and same time. The most importnat is that the conversion won’t reduce the video qaulity. Here we run an top tool as the MXF to Adobe PPro Converter to take an example. Below is the simple guide on how to convert C500 MXF movies to Premiere Pro CS4/5/6 supported formats.


Step 1. After downloading, install and run this Mac MXF Converter for Premiere Pro, just copy the MXF files from the CF cards right to your hard drive, import the files to the software.


Step 2. Click "Format" bar to choose the output format. Click "Format > Adobe Premiere/Sony Vegas > MOV (AVC)(*.mov) or MPEG-2 Video (*.mpg)" as output format. The MXF to Premiere CS Converter for Mac will convert Canon C500 MXF videos to MOV/MPG with the original video resolution.


Step 3. You can click "Settings" button to adjust the parameters, such as resolution, bitrate, etc.

Step 4. Click "Convert" button to start converting Canon C500 MXF to MOV/MPG for importing to Premiere Pro CS4/5/6 on Mac.

After the conversion is finished, just run Adobe Premiere Pro CS4/5/6 and import the .mpg or .mov files for editing. You will find the output video work perfectly on Adobe Premiere Pro CS.


PS. If you do not know how to import video to Adobe, please reference the following guide:

Adobe Premiere Pro workflow: How to import Media Files to Premiere Pro on Mac

Canon MXF

Read More:

Sunday, May 12, 2013

P2 MXF to iMovie- How to get Panasonic AJ-HPX2000 P2 .MXF into iMovie 6/8/9/11on Mac

In this guide, you will learn the easy way to import/edit Panasonic AJ-HPX2000 P2 MXF files into iMovie flawlessly on Mac by transcoding MXF to iMovie Apple Intermediate Codec encoded mov format.


Panasonic AJ-HPX2000 is a multi-format HD production camera that records onto P2 cards. Using the same sensor as the popular VariCam and HDX900 cameras, the HPX2000 can shoot native 720p or switch to shoot 1080i with 24p, 25p & 30p capture. Standard definition NTSC or PAL recording is also available.

While, most of the users have found that the MXF format is not well-suited for some non-linear video edit software including the Apple tool- iMovie. Here is one of the problems we found on the forum. One of my clients just bought a used Panasonic AJ-HPX2000, and wants to edit P2 MXF footages in iMovie 11 on OS 10.6, but he found iMovie can not recognize the P2 .mxf footages. Any idea? From the quoted words, it’s not hard to learn that MXF videos can not be directly imported to iMovie. So, how to import Panasonic P2 MXF to iMovie 6/8/9/11 for editing without any problem? Here we offer you the easiest solution.


To import and edit P2 MXF files in iMoive with ease, you need transcode Panasonic P2 MXF to iMovie supported video format. And we learn that AIC(Apple InterMediate Codec) codec MOV format is the iMovie perfectly supported format. In this case, a professional and easy-to-use P2 MXF Converter is the key. Here Mac P2 MXF to MOV Converter is the highly recommended tool for you.

It supports encoding Panasonic P2 and Canon C300/XF105/XF100/XF300 MXF files to iMovie native format so that you can easily import the Panasonic Camcorder recordings to iMovie for editing on Mac including importing P2 MXF to Avid MC and converting P2 MXF to FCP Prores. This will help you import the file correctly and saving the rendering time.

Convert, Transfer and Edit Panasonic AJ-HPX2000 P2 MXF footages in iMovie with AIC MOV codec

Step 1. Free download the Panasonic MXF to iMovie Converter for Mac, load your P2 MXF files into the program. As a top P2 MXF Converter, it also supports transcoding MXF to Apple ProRes Codec for editing with Final Cut Pro 6/7 and FCP X.


Step 2. Click the format bar, and move mouse cursor to "iMovie and Final Cut Express > Apple Intermediate Codec(AIC) (*.mov)" as output format.


Step 3. Click convert button in the main interface to start transcoding Panasonic P2 MXF to iMovie AIC MOV on mac.

Some more helpful features of the P2 MXF to iMovie Converter for Mac:

1. Settings- click to set video resolution(1920×1080/1440×1080/1280×720/720×480), bitrate(from 1Mbps to 20Mbps), frame rate (24p/30p)

2. Editor (next to "Add" icon)- click to set deinterlace, denoise, mute, volume up, trim, crop, etc.

After the workflow, you can go to the output folder to find the converted video files. Now you are free to load/edit Panasonic AJ-HPX2000 P2 MXF files in iMovie under Mac without problems.

Read More:

Tuesday, May 7, 2013

P2 Mxf To Final Cut Pro- Edit Panasonic P2 MXF in FCP on Mac

Want to edit P2 MXF video in Final Cut Pro? Here we'll show you how to convert and import MXF video to FCP for smooth editing.
Final Cut Pro even FCP X won't import P2 MXF videos from Panasonic camcorder. The easy workaround is to transcode/convert P2 MXF footage to Apple ProRes codec on Mac. It's much easier to be done with a professional P2 MXF Converter Mac. Below is how. 

The Panasonic P2 HD camcorder use the latest AVC-Intra Codec for broadcasting (compatible with MPEG-4 AVC/H.264) at 1080 in 24p, 25p, 30p, 50i and 60i, and in SD (480i/586i) in DVCPRO50, DVCPRO and DV. But new users may face some frustrating result when importing the P2 MXF footage into Final Cut Pro, because the P2 .mxf file format is not fully supported by Mac non-linear editing software such as FCP and iMovie.

Question: How to Import P2 MXF files to FCP on Mac OS X Lion?

Answer: Convert Panasonic MXF to ProRes 422 for Editing in FCP .

How to convert P2 Card MXF footage from Panasonic to ProRes 422 HQ

Step 1. Connect your AVC-Intra MXF Camcorder to iMac with USB 2.0 cable or use card reader to transfer the P2 AVC-Intra .mxf files to Apple hard drive disk.


Step 2. Add Panasonic P2 AVC-Intra MXF videos to this top Mac Panasonic MXF Converter.

Run Pavtube MXF Converter for Mac, and click the "Add Files" button to load .mxf videos.


Step 3. Choose MOV with Apple ProRes 422 codec for Final Cut Pro 6/7/X.

Click the "Profile" option, and move mouse cursor to Final Cut Pro > Apple ProRes 422 HQ (*.mov) as output format. To get 1080 videos, we need to click the "Settings" button and choose 1920*1080 as output video resolution.


Step 4. Specify output file path. Click on "Browse" and browse to where you'd like to save target Apple ProRes 422 HQ video.

Step 5. Convert Panasonic P2 MXF to ProRes 422 MOV for Final Cut Pro 6/7/X.

Click the "Convert" button and the Mac MXF Video converter would start converting Panasonic AVC-Intra MXF videos to Apple ProRes 422 MOV immediately.

Step 6. Press "Open" to locate result video. Launch FCP 6/7/X, and go to "File > Import > Files…" to import converted P2 footage to FCP project.


The software also converts P2 MXF and Canon MXF video to compatible formats for FCE/iMovie, Avid, Adobe Premiere Pro, After Effects, etc. You can convert Panasonic P2 MXF to AIC .MOV for FCE and iMovie, or transcode Panasonic AVC-Intra MXF to H.264 MOV, DV, AVI, M4V, MPG for Avid, Adobe Premiere Pro, and After Effects.

Read More:

Sunday, May 5, 2013

Canon XF305 to FCP- Import Canon XF305 MXF to FCP on Mac

Follow the post to learn how to import Canon XF305 MXF to FCP with FCP native codec on Mac.

The XF305, one of Canon's first file-based professional camcorders, records MPEG-2 MXF (Media eXchange Format) files – up to 1920 x 1080 Full HD at 50Mbps (4:2:2) – to CompactFlash (CF) memory cards. The Canon XF305 also offers multiple recording bit rates, resolutions and variable frame rates to expand your creative flexibility, and allow you to work in virtually any production environment.

Have you put your hands on this professional camcorder? If so, you would have collected a pile of MXF recordings, and have you tried to import Canon XF305 MXF to FCP for editing? Ever encountered some importing or editing troubles? If so, go through the page to find the solution.


As we know, FCP is the free and useful part of the Apple Mac iLife, you can use it to edit your movie or camcorder video which is shot by yourself. It supports video files like MPEG2, DV, HDV, QuickTime Movie and MPEG4 but no Canon XF .mxf files. So, to freely edit XF305 MXF in FCP on Mac, you need to convert XF305 MXF to FCP compatible video format.

Canon MXF to FCP Converter is the best Mac MXF Converter for you to convert MXF to iMovie on Mac. You can use it to convert/trasnscode Canon XF305 MXF files to Prores(Apple Prores Codec) codec MOV format, which is the FCP perfectly supported one. You can follow the guide below.

1. Download this best MXF converter for Mac OS X. This MXF to MOV converter will help you convert MXF to any formats you want, such as Apple ProRes 422 MOV, Apple InterMediate Codec MOV, etc.


2. Install and launch this XF305 MXF video converter for Mac. Import XF305 footages to the MXF Converter.

3. Click format bar to choose the output format you want. For converting XF305 MXF to FCP, you can choose Final Cut Pro -> Apple ProRes 422 (*.mov), it’s best supported by FCP.


4. You can click settings button to adjust the output parameters if you want.

5. Click convert button to start converting MXF to Apple ProRes 422.

With the best MXF to MOV Converter, you can easily convert XF305 MXF to FCP, by converting MXF to ProRes 422 codec MOV format, you can edit recorded footages in FCP smoothly.

Read More:

Wednesday, April 24, 2013

TS to Final Cut Express - Convert TS video to FCE on Mac with AIC codec

Pavtube TS to FCE Converter is the best chosice for you to easily and fast convert/import/bring your TS video into FCE on Mac.

MPEG transport stream (TS) is a standard format for transmission and storage of audio, video, and data, and is used in broadcast systems such as DVB and ATSC. Maybe you have some .ts videos or TS files and want to editing them on iMovie on Mac.


Final Cut Express, non-linear video editing application created by Apple Inc, is the relatively inexpensive consumer version of a professional video editng suite. Final Cut Express gives you the capability to synchronize images and sound, add special effects, and export projects as standalone videos in a variety of formats. Final Cut Express accepted video: MOV (*.MOV), DV Format (*.DV) and MPEG-4 Movie (*.MP4) , but no support for .ts files.


If you got a bunch of files end with .ts extension and want to edit TS with Final Cut Express, the best way to edit your TS files on FCE will be converting them to formats that are perfectly supported by FCE. TS to FCE Converter is the perfectly right tool for users who cannot import TS to FCE on Mac.

Pavtube MTS/M2TS Converter for Mac is an easy to use tool for you to encode TS files to FCE editable AIC .mov format. It features optimal format presets for these editing apps, resulting files with great image and sound quality without audio delay issues. Best of all, the 5.1 channels in your original TS files can be remained as well.

Easy steps: TS to Final Cut Express converting tutorial

Step 1: Add TS video

Go to download and install the best  to make the transcoding task without quality loss. Then launch the software to import your .ts clips to Mac TS to AIC Converter.


Step 2: Select the right output format

Click on the Format box to choose iMovie and Final Cut Express-> Apple InterMediate Codec (AIC) (*.mov) for FCE.


Step 3: Convert TS to FCE MOV

Hit the Convert button; it will convert TS to FCE on Mac immediately.

When the conversion finished, you can directly import the output AIC MOV files to Final Cut Express for editing and make your movies. The importing needn't any rendering because the AIC MOV is one of the compatible video formats on Mac OS X Lion.


Tip: 

Pavtube iMedia Converter for Mac can convert 1080p camcorders footages to editable HD video formats for non-linear editing software like iMovie, Final Cut Express, Final Cut Pro, Final Cut Studio, Avid, Adobe Premiere etc. The HD footage can be compressed to SD video clips for storage when you wanna save storage space. The Mac iMedia Converter is also able to extract audios from Blu-ray discs, DVDs and videos for media players with high quality and fast conversion speed.

Related points:

Sunday, April 14, 2013

How to convert Canon Vixia video AVCHD (.mts) to iMovie

This guide shows users how to convert Canon Vixia AVCHD files to AIC with Mac MTS to iMovie Converter on Mac.

Canon are very popular in the market, it's a great competitor to sony and Panasonic. And Canon Vixia camcorder can give us high quality images, the HD Video Lens make every scene clear and steady, and new built-in features make it easy to give your videos added creativity, so it's a good choice if you have got one.


If you have used Canon vixia camcorders to recorded many HD videos, you may need to import Canon Vixia AVCHD files to iMovie for editing. But, you may encounter many problems when you want to load and edit Canon MTS/M2TS in iMovie, the reason is that AVCHD format is not well supported by iMovie on Mac, iMovie best format is Apple InterMediate Codec (AIC) MOV format, so if you want to import and edit Canon AVCHD videos in iMovie smoothly, the best way is to convert AVCHD to AIC format. Below is a guide for you.

1. Free download Canon Vixia Converter for Mac, it's an excellent Canon Vixia AVCHD converter which can help you convert Canon Vixia recorded files to FCP, iMovie, etc.

2. Install and run this Vixia MTS converter. Import the files you want to convert.


3. Click format bar to choose the format for output, you can choose iMovie and Final Cut Express -> Apple InterMediate Codec (AIC) (*.mov). It's the best format for iMovie - to import Canon Vixia MTS clips to iMovie or FCE.


4. You can click settings button to adjust output parameters, such as resolution, bitrate, etc.

5. Click "Convert" button to start.

This Canon Vixia AVCHD converter can help you transcode Canon Vixia AVCDH files to rich formats for use, and Vixia series camcorders are well supported, you can convert Canon XA10 to iMovie, convert Vixia HF M300 to iMovie, convert Vixia HF M500 to iMovie, convert Canon Vixia HF S10 to iMovie, convert Canon Vixia HF S100 to iMovie, etc. just follow the steps above and import Canon Vixia video to iMovie for further use.

More Related Guide:

Wednesday, April 10, 2013

Import/Load Canon VIXIA HF S100 MTS to FCP X on Mac OS X

Have got a Canon VIXIA HF S100 and have issues with importing movies from HF S100 into FCP X? Is there any solution? Just convert MTS video to Prores for FCP editing on Mac.

Canon Vixia HF S100 goes beyond home movies with features specially included for the aspiring film-maker. The camera has microphone and headphone terminals and a Mini Advanced Accessory shoe for holding external lights and mics. Not only that, but 24p Cinema mode gives your video a film-look while 30p Progressive mode is ideal for action or sports footage. The VIXIA HF S100 allows you to record at up to 24Mbps, the highest bit rate in AVCHD format, for the highest quality image.

My Sister Jane is a user of Canon VIXIA HF S100, she likes it very much as it can shot 1080p 60p HD movies smoothly for her , which make her gain a stanout experience of hdcamcorder, and currently she uses the FCP X for editing, she told me while she is trying to drag and import the avchd files from S100 to FCP X timeline, they immediately need rendering, and the timeline becomes extremely sluggish for scan or preview.


Actually, as we all know, AVCHD is not the favorable format for all the non-linear editing software like Final Cut Pro, FCE, iMovie, including Adobe Premiere Pro.
So if we want to import AVCHD files to FCP X with less quality loss, we need to google and download an excellent MTS Converter for FCP to transcode Canon Vixia AVCHD to Prores MOV(compatible format for FCP 6/7X) without rendering.

As far as I know, Pavtube MTS/M2TS Converter for Mac is the best Mac AVCHD to FCP Converter, you can go to download it and have a free try! Below is a simple guide for importing Canon Vixia HF S100 AVCHD MTS/M2TS to FCP X for editing on Mac OS X, take a look at it and take as a reference.

Step 1. Load Canon HF S100 AVCHD videos to Mac AVCHD to Prores Converter.

Just connect Canon HF S100 to iMac with USB cable, and copy the files to hard drive. Run Pavtube Canon AVCHD Video Converter for Mac as the best Canon AVCHD to FCP Converter, and click the "Add" button to load 1920×1080 .mts videos.


Step 2. Choose the best output video format for editing in FCP X.

Clock the format column and choose the Final Cut Pro > Apple ProRes 422 (*.mov). It’s the best video format for FCP.


Step 3. If you want to adjust the output videos’ parameters, you can click settings button to change the Size, the Bitrate, and the Codec for getting the perfect effects.

Step 4. If you want to edit the video before converting Canon HF S100 AVCHD to FCP MOV format, Pavtube iMedia for Mac offers easy but useful edit function as shows below.

Step 5.Click "Convert" button to transcode Canon HF S100 AVCHD to ProRes 422 for FCP X editing on Mac OS X Lion.

P.S.

Pavtube MTS/M2TS Converter for Mac can convert 1080p cameras/camcorders footages to editable HD video formats for non-linear editing software like iMovie, Final Cut Express, Final Cut Pro, Final Cut Studio, Avid, Adobe Premiere etc. The HD footage can be compressed to SD video clips for storage when you wanna save storage space.

Read More:

Tuesday, April 9, 2013

Convert/Import/Edit MXF/P2 MXF recordings in iMovie '11

Shot footage in MXF format? This article tells you how import your .mxf files to edit in iMovie 11 by converting MXF to AIC codec.
 
Nowadays, the professional camcorders such as Canon XF series camcorders and Panasonic P2 card camcorders are becoming more and more popular. While, what's a pity that these professional camcorders shooting footage in MXF format cannot be recognized by the popular video editor iMovie, even the latest version iMovie '11. So, how to import MXF/P2 MXF files to iMovie '11 for editing without any trouble?


You need a MXF Converter to convert MXF to iMovie supported video format, iMovie best video format is Apple Intermediate Codec (AIC) MOV format, so it’s great choice to transcode MXF to iMovie AIC MOV format, you can follow the guide below.


1. Download Pavtube MXF Converter for Mac, this software supports MXF conversion well; you can choose many formats for output.


2. Install and launch the MXF to iMovie converter.

3. Click format bar to choose best output format. For editing MXF files in iMovie on Mac OS, you can click and choose “iMovie > Apple Intermediate Codec (*.mov)”.


4. You can click settings button to adjust output parameters.

5. Click convert button to start. Pavtube MXF Converter will help you import/edit MXF to iMovie on Mac easily. Then you can use converted MXF files in iMovie on Mac as you want.

Tips:

The MXF/P2 MXF to iMovie Converter is the best application for you to convert/transcode MXF files to iMovie'11. Besides, if you want to convert/import MXF to FCP X, iDVD, etc for editing, this MXF/P2 MXF to iMovie Converter can also do you a favor.

Read more:

Convert Canon C500 (PL) 4K MXF to FCP X
Transcode MXF/P2 MXF to Apple ProRes for FCP X

Monday, April 8, 2013

Compatibility of Nikon mov files with Mac in FCP, Avid, iMovie, Premiere Pro, FCE

Along with Pavtube MOV Converter for Mac, you can easily convert and import Nikon MOV footage into FCP, Avid, iMovie, Premiere Pro, FCE for further editing on Mac (Mac Mountain Lion and OS X 10.9 Mavericks included).

Nikon DSLRs are excellent so that many people willing to buy one. Nikon hot cameras include Nikon D800, D4, D7000, Nikon D3100, D3200, D5100, etc. It's great to take photos and record full HD 1080P videos by Nikon DSLR. The Nikon DSLR recorded video format is H.264 MOV, this format is supported by many editing software, but sometime it is not supported perfectly on Mac editing software, like Final Cut Pro and Avid Media Composer 6. The main reason is the H.264 codec not well for editing.


What is Final Cut Pro 7/X best supported codec and format?

Final Cut Pro X/7 supported best video format is Apple ProRes 422 Codec MOV format, you can edit Nikon MOV video with this format in Final Cut Pro X smoothly without rendering.

What is Avid Media Composer 6 best supported codec and format on Mac mountain Lion?

Avid MC 6 best supported video format is DNxHD codec MOV format, or XDCAM codec MOV format, so DNxHD is the first choice if you need to edit Nikon MOV in Avid Media Composer 6.

What software supports Nikon H.264 MOV and both FCP 7/X, AMC 6 best codec output?

The best I have used is Pavtube HD Video Converter for Mac, it can convert videos with good video and audio quality, and offer rich video formats for output, such as convert Nikon MOV to ProRes 422 for FCP 7/X, or convert Nikon h.264 to DNxHD for AMC 6.

Here are easy steps for you to transcode Nikon MOV to both FCP 7/X and AMC 6.

1. Download Pavtube HD Video Converter for Mac, install and run this Nikon MOV to FCP/AMC converter on Mac Mountain Lion.


2. Click "Add" to load Nikon MOV video files or directly drag the files into file list.

3. Click "Format" bar to determine output format. You are recommended to choose Final Cut Pro -> Apple ProRes 422 (*.mov), it's for FCP 7/X; or choose Avid Media Composer -> Avid DNxHD (*.mov), it's for AMC 6.


4. Click convert button to start transcoding Nikon MOV to FCP 7/X or AMC 6.

As shown above, it is very easy to change Nikon MOV to prores 422 MOV, or DNxHD codec MOV, it becomes easy for you to use the recorded footages in Final Cut Pro 7/X and Avid Media Composer 6.

This Mac Nikon MOV Video Converter can also convert Nikon MOV to iMovie, Premiere Pro, FCE with good quality, just download the and have a try.

Sunday, April 7, 2013

Lossless edit best Digital SLR Cameras H.264 HD clips in FCP X

H.264 is a new video codec standard which can achieve high quality video in relatively low bitrates and it is a popular video format for playing. High definition video brings us more detailed, lifelike and impactful images. But not all HD video capture devices are created equal.

Best Digital SLR Cameras for Shooting Video recommended for you like: Canon T3i,60D,5D Mk II,5D Mark III,Nikon D700,Sony Alpha55,Sony NEX3 and Panasonic/Pentax/Olympus/Fujifilm cameras etc can capture in .mov container with this H.264 codec. Plus, like GoPro can also shot in this H.264 format in .mp4 container,also Sanyo Xacti HD shootings. But more the H.264 videos, the more video to FCP importing problems we will meet.

After recording, you may want to edit the video footages in FCP X on Mac, but, some video codecs and formats are not well supported by Final Cut Pro X, this article will share the way to transcode Canon/Nikon/Sony/Panasonic/Pentax/Olympus/Fujifilmrecorded videos to Apple ProRes 422 for FCP X editing, the prores codec is best for FCP X editing, with this codec, you can edit video in FCP X smoothly without any problems.

1. Download Pavtube HD Video Converter for Mac. This professional HD Video Converter can help you convert Canon/Nikon/Sony/Panasonic/Pentax/Olympus/Fujifilm video files to ProRes 422 MOV format for Final Cut Pro X, more output formats are also supported.


2. Install and launch this Canon/Nikon/Sony/Panasonic/Pentax/Olympus/Fujifilm video Converter. Import footage to the converter.

3. Click format bar to choose the output format. Click and choose Final Cut Pro -> Apple ProRes 422 (*.mov).


4. You can click "settings" to customize the output parameters, adjust the resolution, bitrate as you want.

5. Click convert button to start.

With this Canon/Nikon/Sony/Panasonic/Pentax/Olympus/Fujifilm/GoPro to Apple ProRes 422 converter, you can easily import camera video files to FCP X for editing, this software runs fast, so you can convert HD footages to FCP X in less time, video and audio synchronization are perfectly guaranteed.

How to take converted videos to FCP

For FCP 7: Simply navigate to File > Import > Files and select the converted clips. There is no need "Log and Transfer" with typical camcorders.

For FCP X, navigate to File > Import > Media and in the window that comes up, select your transcoded ProRes clips.

Read more:

Convert Canon XF300 MXF files to AIC .MOV for iMovie/FCE
Why MXF from Canon C300 not reading in Premiere Pro CS 6?

Saturday, April 6, 2013

How to convert mxf file to FCP 6/7/X support format on Mac

With this awesome guide, you can smoothly import and edit MXF files in Final Cut Pro 6/7/X by converting MXF to Prores MOV format.

Final Cut Pro is a professional non-linear editing software application developed by Macromedia Inc. and then Apple Inc. It supports like DV, HDV, etc. but no mxf format so if you want to edit mxf files with FCP, you should convert mxf file to FCP support format videos like dv, and then import mxf file into FCP for editing. Many people get some MXF files from their camcorders and want to edit them in Final Cut Pro on Mac to make their own videos or movies. But they face the problem is when they try to import MXF to FCP, they find that FCP can't recognize the MXF files.

To make MXF files compatible with Final Cut Pro, and you need to convert mxf videos to something that can be handled, such as ProRes 422 codec. This is a standard-definition and high-definition lossy video compression format developed by Apple. ProRes 422 is intended for video editing with Apple's non-linear editing software Final Cut (Pro). It retains higher quality than end-user codecs while still requiring much less expensive disk systems compared to uncompressed video.

The guide below shares with you the way converting MXF videos to Apple ProRes 422 encoded MOV files, so as to import the MXF footage to Final Cut Pro for editing.

Tips: Before converting MXF video, you need to put MXF file structure to Mac HDD, because MXF systems produce split-file A/V (that is, the video and audio stored in separate files). You also need a Mac oriented MXF Converter tool that features ProRes 422 encoder.

1. Download and run the Pavtube MXF Converter for Mac. Import MXF video clip to MXF converter.


2. Click on "Format" and choose “Final Cut Pro >>Apple ProRes 422 (*.mov)” format for output. It’s the best format for editing with Mac video editing software.


3. You can click "Settings" to set video resolution (1920×1080/1440×1080/1280×720/720×480), bitratefrom 1Mbps to 20Mbps, frame rate (24p/30p) as you like.

4. Click "Convert" button to start transcoding MXF to Apple ProRes codec / converting .mxf to .mov videos.

After conversion, you just need to open the output folder and import the videos to FCP or other editing software. Now, you could edit MXF videos on Final Cut Pro 6/7/X as ease.

More related: